
Alarm Panel Programming Guide
Alarm Panel Programming Guide
Knowledge Base › Alarm Systems · Last reviewed September 2026 · Connixtech technical team
Programming an intruder alarm panel means setting four groups of things: how the system is structured, how it behaves in time, who can operate it, and what it does when triggered.
Every manufacturer uses different menu numbers, so this covers the decisions and the sequence rather than keystrokes. Keep the panel’s engineer manual open alongside.
Which standards apply in New Zealand?
| Standard | Covers |
|---|---|
| AS/NZS 2201.1:2007 | Client’s premises: design, install, commissioning |
| AS 2201.2-2004 | Monitoring centres |
| AS 2201.3:1991 | Detection devices for internal use |
| AS 2201.4:1990 | Wire-free systems |
| AS/NZS 2201.5:2008 | Alarm transmission systems and rating |
Note the split: AS/NZS 2201.1 explicitly does not cover transmission of signals from the premises to a monitoring centre. That sits in 2201.5, which sets a rating system for transmission paths. If a client or insurer specifies a grade, ask which part they mean.
Licensing is a legal requirement, not a trade convention. Under the Private Security Personnel and Private Investigators Act 2010, security system installation work in New Zealand requires the appropriate licence or certificate of approval. The New Zealand Security Association also publishes codes of practice its accredited members work to.
Before you start
Write these down before entering engineer mode: number of areas and what each covers; the zone list with number, location, device, zone type and area; the entry route from each door to the keypad; who needs a code and what each may do; whether the system is monitored and by whom; and which outputs drive what.
A panel programmed without this on paper will be reprogrammed within a month.
Engineer mode
- Change the default engineer code immediately. Defaults are published in every manual online.
- Note whether the panel supports “engineer access requires user authorisation”. Good practice on commercial sites.
- Record the engineer code securely. A lost engineer code on some panels means a default procedure that erases all programming.
How do I set alarm entry and exit times?
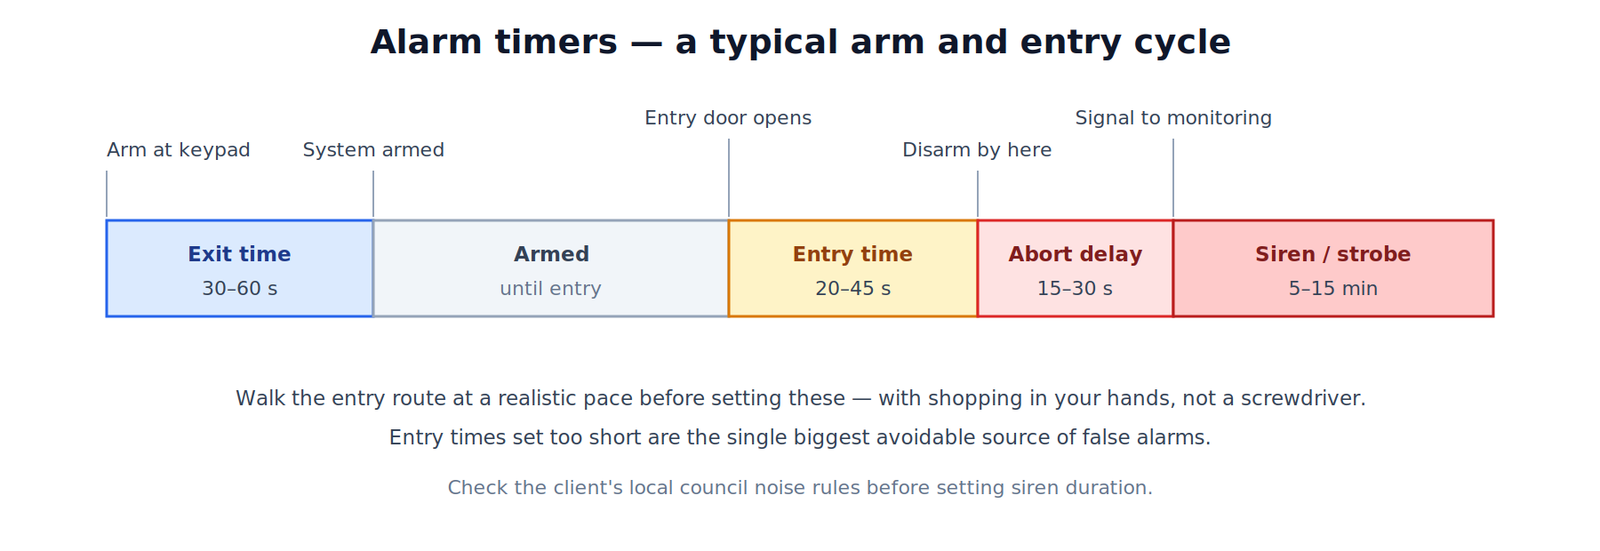
| Timer | Typical range | Purpose |
|---|---|---|
| Exit time | 30–60 s | Time to leave after arming |
| Entry time | 20–45 s | Time to reach the keypad |
| Siren duration | 5–15 min | Check local council noise rules |
| Strobe | Until reset | Helps responders find the site |
| Abort delay | 15–30 s | Reduces false alarm traffic |
Set entry and exit times by walking the route at a normal pace with something in your hands. A client arriving with shopping and a toddler needs longer than an installer with a screwdriver.
Siren duration is a council matter. New Zealand councils commonly limit audible alarm duration under their noise rules, and the limit differs between territorial authorities. Check the client’s local council rather than defaulting to the panel maximum.
Areas and part-set modes
| Mode | Active zones |
|---|---|
| Full set | All zones |
| Part set A (night) | Perimeter, downstairs PIRs; bedrooms omitted |
| Part set B (home) | Perimeter only |
Areas (sometimes called partitions) let one panel protect sections that arm independently. A common commercial case is an office closing at 5pm sharing a building with a workshop running until 10pm: two areas, two arming schedules, one panel, one monitoring account.
Zones can usually belong to more than one area — a shared corridor or common entry might sit in both, so it only arms when every area sharing it is armed. Check how your panel handles shared zones before designing around it, because implementations differ.
Part-set modes arm the perimeter while leaving internal detectors inactive, so people can move around inside an armed system.
Assign every zone deliberately to each mode. The default assignment will not match the client’s actual use. Zone types and wiring are covered in Alarm Zone Configuration.
Outputs
| Output | Drives | Typical setting |
|---|---|---|
| Bell / external siren | Siren and strobe | Timed, per council limits |
| Internal sounder | Indoor sounder | Full alarm duration |
| Strobe | External strobe | Latched until reset |
| Set / unset status | Third-party equipment | Follows arm state |
Users and codes
- Create a master user for the client and remove or change default user codes. Defaults like 1234 are published everywhere.
- Create individual codes per person. Shared codes destroy the event log’s usefulness.
- Set user rights per code: arm only, arm/disarm, omit zones, add users, engineer access.
- Program cleaner and contractor codes with time restrictions where supported.
- Do not leave your own installer code active after handover.
How do I program a new user code?
The sequence differs by panel, but the decisions are the same every time.
- Choose the user slot. Most panels number user slots, with slot 1 as the master. Record which slot holds which person — the panel will not tell you later.
- Set the code length. Four digits is the common default; six is materially harder to guess and worth specifying commercially. Changing length later usually resets every existing code, so decide at commissioning.
- Assign the areas that user may arm and disarm. A cleaner working only in the office should not be able to disarm the workshop.
- Set the authority level — arm only, arm and disarm, or manager with rights to add users and omit zones.
- Add a time restriction where supported, so contractor and cleaner codes only work in their window.
- Test the code at the keypad before writing it into the handover pack.
Duress codes
A duress code disarms the system normally — no siren, no visible difference at the keypad — while sending a silent duress signal to the monitoring station. It exists for the situation where someone is forced to disarm under threat.
Two things to get right. The code must be memorable under stress but not adjacent to the normal code; some panels derive it by incrementing the last digit, which is convenient and also the first thing an informed offender would try. And tell the monitoring station it is programmed, confirming what response it triggers.
Train the client that a duress code is never used casually. A duress signal that turns out to be someone testing it erodes exactly the response it exists to guarantee.
How long must the alarm battery last?
Standby duration is a design requirement, not a preference — AS/NZS 2201.1 and the monitoring provider’s grading specify a minimum for the class of system. Size the battery against the load the panel actually holds up during a mains failure.
Treat that as a floor. Sealed lead-acid capacity is quoted at a 20-hour discharge rate, so drawing it down faster returns less than the rated figure, and a battery at end of service life is down further again. Date-label every battery you fit and put replacement on the service schedule. See Batteries.
Common programming mistakes
| Mistake | What it causes |
|---|---|
| Default engineer code left in place | Anyone with the manual can reprogram the panel |
| Installer user code left active | Ex-installer can disarm the site |
| Entry time set from the panel, not the door | False alarms on every late arrival |
| Internal PIRs live in part-set | Client trips their own alarm at night |
| No abort delay | Every accidental trigger reaches monitoring |
| Zone names left as defaults | Nobody can read the event log during an incident |
| Clock never set to NZ time | Log timestamps useless as evidence |
Testing and handover
Walk test every zone. Not a sample. Every zone.
- Every zone walk tested and correctly identified
- Every tamper tested — device covers, panel lid, siren housing, EOL loops
- Entry and exit timing walked at realistic pace
- Each part-set mode tested with the correct zones active
- Siren and strobe operate and stop at the programmed time
- Battery test: mains removed, system runs the required standby period and reports mains fail
- Communicator tested end to end with the monitoring station
- Duress code tested with the monitoring station’s knowledge
- Event log shows correct time and date
- Client trained on arming, disarming, part-setting, omitting a zone and what to do on a false alarm
- Codes, zone list and engineer details in the handover pack
How do I reduce false alarms?
- Entry time too short for the actual occupants
- Internal PIRs left active in part-set modes covering areas people move through at night
- Detectors facing heat sources, direct sun, heat pumps or moving stock
- Pets in the protected area without correctly mounted pet-immune detectors
- No abort delay, so every accidental trigger reaches the monitoring station
- Users never trained on how to omit a zone
Specifying an alarm system? Connixtech’s technical team is available Monday–Friday, 8am–5pm NZT. Email info@connixtech.co.nz or call +64 27 284 7161. Trade customers can download manuals from the Downloads page.
Standards references verified September 2026 via Standards New Zealand and building.govt.nz. General trade information, not legal advice — confirm licensing and grading for your specific work.