
NVR/DVR Setup Guide
Knowledge Base › CCTV · Last reviewed September 2026 · Connixtech technical team
An NVR records video from IP cameras over a network. A DVR records from analogue cameras over coax. The commissioning steps are broadly the same: fit storage, set the network, add cameras, configure recording, secure the device, test.
For camera placement see CCTV Camera Mounting and Positioning; for remote access see CCTV Remote Viewing Configuration.
Fitting the hard drives
Use surveillance-rated drives. They are specified for continuous write workloads, high drive counts and multi-drive vibration. Desktop drives are not, and fail early under that duty cycle — usually just before the client needs the footage.
- Power down and disconnect mains before opening the case. Observe ESD precautions.
- Check the recorder’s maximum supported drive capacity and count before ordering. Exceeding it is a common cause of “drive not detected”.
- Mount drives on the supplied tray with all screws. An unsecured drive vibrates and shortens its own life and its neighbour’s.
- Fill bays in order and record serial numbers against bay positions in the handover pack.
See Hard Drives and NVR / DVR Recorders.
How to calculate NVR storage capacity
Work it out rather than guessing. Clients specify retention in days; drives are sold in terabytes.
Indicative bitrates — confirm against the camera datasheet, since smart codecs and scene complexity change these substantially:
| Camera | H.264 | H.265 |
|---|---|---|
| 2 MP (1080p) @ 25 fps | ~4 Mbps | ~2 Mbps |
| 4 MP @ 25 fps | ~8 Mbps | ~4 Mbps |
| 8 MP (4K) @ 25 fps | ~16 Mbps | ~8 Mbps |
H.265 roughly halves storage against H.264 for the same picture. Smart or “+” codec variants reduce it further on static scenes but degrade quality during motion — which is exactly when you need it. Use them on overview cameras, not identification cameras.
Sanity-check this against reality. Recorded bitrate on a busy scene routinely exceeds datasheet figures. After a fortnight of running, check the actual oldest recording date against your calculated retention. If it is short, the estimate was optimistic — not the maths.
First boot and activation
- Connect a monitor via HDMI and a USB mouse. See HDMI Cables.
- Set a strong admin password. Modern Hikvision devices ship uninitialised — there is no default password, and the device must be activated before it will do anything. Record it in the handover pack; a lost admin password generally means a factory reset and losing the configuration.
- Set the time zone to New Zealand, enable NZDT handling, and configure NTP. Incorrect timestamps make footage far less useful as evidence, and recorders drift by minutes over months without it.
- Initialise the drives when prompted.
- Skip the wizard’s default recording settings — configure them deliberately below.
What IP address does an NVR use?
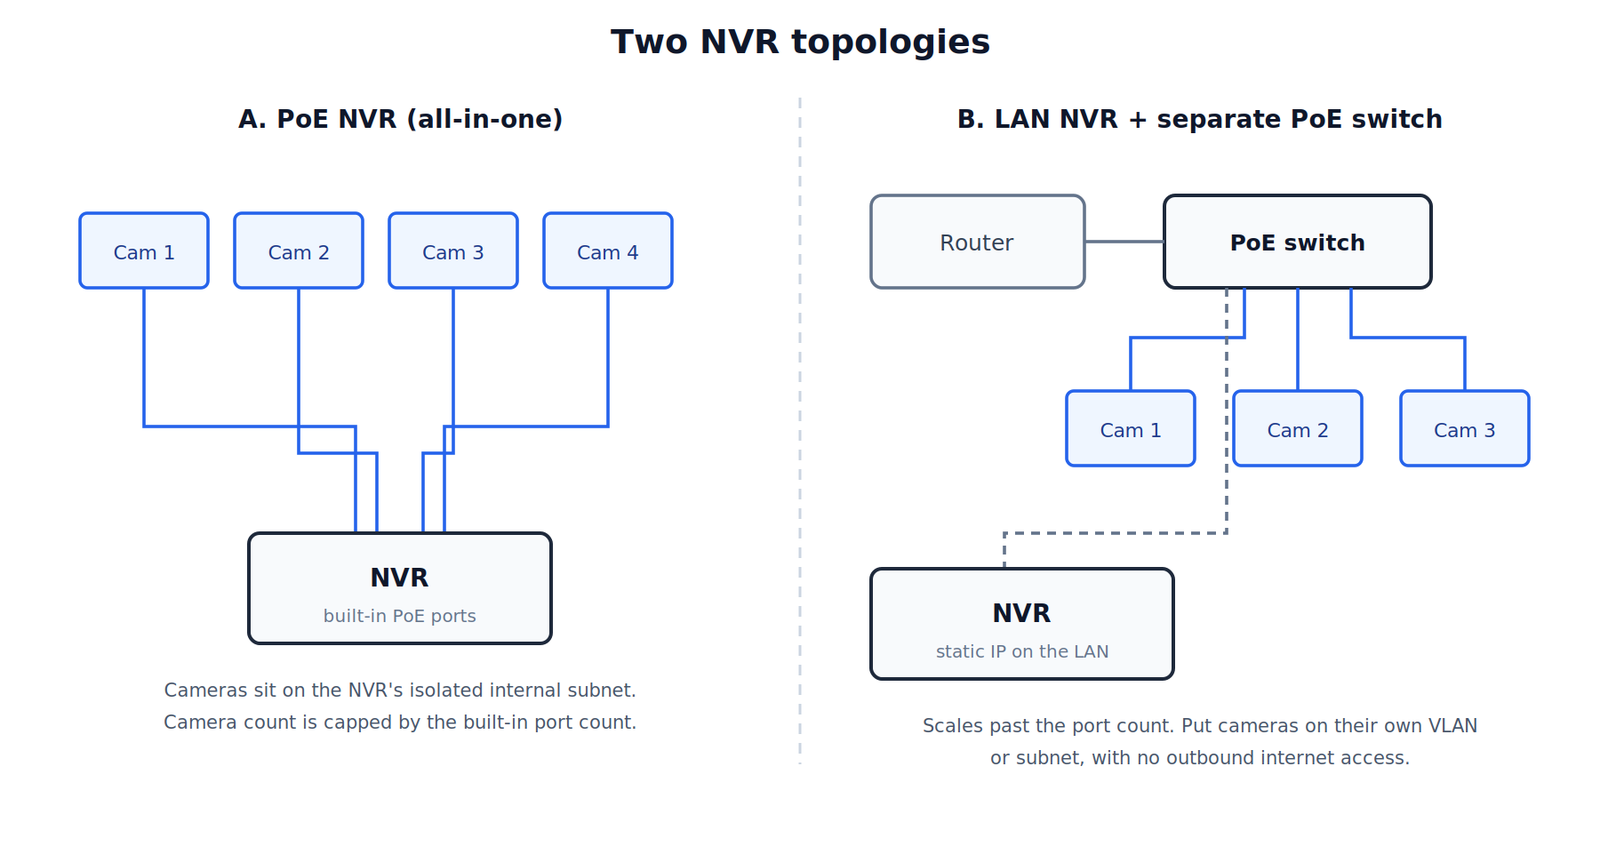
PoE-switch NVRs have built-in PoE ports on an isolated internal network. Cameras plug directly into the recorder and are addressed automatically. Simple, but camera count is capped at the built-in port count.
LAN-connected NVRs sit on the client’s network with cameras fed by a separate PoE switch. More flexible, scales past the port count, and is the right choice for anything but a small kit.
- Assign the recorder a static IP inside the client’s subnet, outside the DHCP scope
- Set subnet mask, gateway and DNS correctly
- Put cameras on a separate VLAN or subnet with no outbound internet
- Never leave the recorder on its factory address on a live LAN
Factory defaults — and the trap
| Brand | Typical default | Discovery tool |
|---|---|---|
| Hikvision / HiLook | 192.168.1.64 | SADP |
| Dahua | 192.168.1.108 | ConfigTool |
Older and some OEM Hikvision units use 192.0.0.64 instead. If 192.168.1.64 does not respond, SADP is the reliable way to find the actual address. Confirm Uniview and TVT defaults against the model’s own manual rather than a general list.
The trap: plug five new cameras in at once and they all claim the same default address. The result is address conflicts, unstable connections and packet loss that looks like a cabling fault. Configure one at a time, or use the discovery tool to assign unique addresses before finalising the install.
How to set up an NVR with IP cameras
- Run a device search on the recorder’s camera management page.
- Add the cameras. If they are uninitialised, activate them from the recorder and apply the site password.
- For third-party cameras, add manually over ONVIF with IP, ONVIF port and credentials. ONVIF typically exposes fewer features than a same-brand connection.
- Confirm every channel shows live video before moving on.
- Name every channel meaningfully — “Rear yard”, “Main entry”, not “Camera 3”. Two minutes here saves hours during an incident review.
- Set main stream for recording, sub stream for remote viewing and multi-view.
Should I record continuously or on motion?
| Mode | When to use | Trade-off |
|---|---|---|
| Continuous | Entries, tills, high-value areas | Most storage, nothing missed |
| Motion-triggered | Low-traffic external areas | Missed events if poorly tuned |
| Continuous + motion HQ | Good default | Complexity |
| Event / analytics | Perimeters | Fewer false triggers, more setup |
Set pre-record to 5–10 seconds and post-record to 10–30 seconds on any triggered recording, or you capture the middle of an event and miss its start.
Set overwrite-oldest-when-full. Otherwise recording simply stops when the drive fills and nobody notices until they need footage.
Tune motion detection on site: mask out trees, flags, road traffic and anything outside the property. Untuned motion detection on a windy Wellington site fills the drive with footage of a swaying shrub.
How do I secure an NVR?
- Change all default passwords, including separate camera passwords
- Create view-only accounts for day-to-day operators. Do not hand staff the admin account.
- Disable unused services — UPnP, Telnet, SSH, unused protocols
- Do not port forward the recorder to the internet.
- Consider moving the HTTP port off 80 and enabling HTTPS for management traffic
- Update firmware before handover
- Enable email or app alerts for HDD failure and video loss
Testing and handover
- Every channel records and plays back
- Timestamp correct on every channel; NTP working
- Motion masks tuned; walk test triggers recording where intended
- Playback, search and export tested — export a clip to USB and confirm the client can open it
- Retention verified against calculation after a fortnight of running
- HDD health check clean; failure alerts enabled
- Remote access tested from outside the site network
- Client shown live view, playback, search and export
- Passwords, IP addresses, drive serials and camera map in the handover pack
Fault-finding
| Symptom | First checks |
|---|---|
| HDD not detected | Capacity exceeds maximum; seating; initialising |
| Camera added, no image | Stream settings, credentials, PoE budget |
| Camera drops out intermittently | Run over 100 m; CCA cable; duplicate IP |
| Recording gaps | Untuned motion; drive full without overwrite |
| Remote playback stutters | Viewing main stream instead of sub |
| Retention shorter than calculated | Actual bitrate exceeds estimate |
Sizing a system? Connixtech’s technical team is available Monday–Friday, 8am–5pm NZT. Email info@connixtech.co.nz or call +64 27 284 7161.
PoE and addressing details verified September 2026. Default addresses vary by model and firmware generation — always confirm against the manual for the unit in front of you.